🚗✨ Vehicle detection from drone footage can be tricky. Many people struggle with collecting quality datasets, choosing the right model, and ensuring accurate predictions in real-time. Detecting small or distant vehicles under different lighting and weather conditions adds even more challenges.
In this blog post, we will cover how to load and prepare a dataset for YOLOv8, train and validate the model for vehicle detection, and finally run predictions on both images and videos.
🚀 Let’s dive into how YOLOv8 can be used to build an efficient vehicle detection system, explore its performance, and see how it works on real traffic footage!
Video Tutorial
Overview
| Item | Details |
|---|---|
| Category | Computer Vision |
| Goal | Detect and classify vehicles in drone footage |
| Data Source | Roboflow Universe (Drone Crossroad Tracking Dataset) |
| Task Type | Object Detection |
| Data Type | Images / Video |
| Algorithms | YOLOv8 |
| Evaluation Metrics | mAP, Precision, Recall, IoU |
| IDE | Google Colab |
| Tools | Ultralytics YOLO, Roboflow |
Loading Dataset
Install Roboflow
!pip install roboflow✅ Key Insights:
- Roboflow provides an easy way to download and manage datasets for computer vision tasks.
- It also takes care of the correct YOLO format automatically.
Import Roboflow and authenticate
from roboflow import Roboflow

rf = Roboflow(api_key="YOUR_API_KEY")
✅ Key Insights:
- Roboflow API key allows you to access private/public datasets linked to your account.
rfconnects to your Roboflow workspace.
Select project & version
project = rf.workspace("YOUR_WORKSPACE").project("dronecrossroadtracking-cokfy")
version = project.version(1)
✅ Key Insights:
- Workspace:
YOUR_WORKSPACE - Project name:
dronecrossroadtracking-cokfy - Version:
1(datasets can have multiple versions, e.g., after adding new images/annotations).
Download dataset in YOLOv8 format
dataset = version.download("yolov8")✅ Key Insights:
- Downloads and extracts dataset in a folder like:
- /content/DroneCrossroadTracking-1
train/images/&train/labels/valid/images/&valid/labels/test/imagesdata.yaml(defines class names & dataset paths)
- /content/DroneCrossroadTracking-1
- The dataset includes drone-based traffic footage, with annotations for:
- Cars
- Trucks
Installing YOLOv8
Install Ultralytics package
!pip install ultralytics✅ Key Insights:
- Ultralytics is the official YOLOv8 library.
- It includes everything you need for:
- Training
- Validation
- Prediction (images & videos)
- Exporting models
Verify installation
import ultralytics
print(ultralytics.__version__)
✅ Key Insights:
- This confirms the library is installed correctly.
- It shows version.
Training
Initialize YOLOv8 model
from ultralytics import YOLO

model = YOLO('yolov8n.pt')
✅ Key Insights:
- Loads the YOLOv8 Nano model pre-trained on the COCO dataset.
- This gives the model a good starting point (transfer learning).
Start training
model.train(
    data='/content/DroneCrossroadTracking-1/data.yaml',
    epochs=50,
    imgsz=640,
    batch=16
)
✅ Key Insights:
- data=… → path to the dataset YAML file. It tells YOLO:
- Where train/val images are
- Class names (
car,truck)
- epochs=50 → train for 50 passes through the entire dataset.
- imgsz=640 → resize images to 640×640 during training.
- batch=16 → number of images per training batch (depends on GPU memory).
Training outputs
from IPython.display import Image

Image(filename='/content/runs/detect/train/confusion_matrix.png', width=600)
Image(filename='/content/runs/detect/train/results.png', width=600)
Image(filename='/content/runs/detect/train/F1_curve.png', width=600)
Image(filename='/content/runs/detect/train/val_batch0_pred.jpg', width=600)
✅ Key Insights:
During training, YOLOv8 automatically generates:
- Results plots:
- Loss curves (box loss, class loss)
- mAP curve over epochs
- Precision-Recall curve
- F1-Confidence curve
- Confusion Matrix → shows correct vs incorrect predictions
- Validation sample predictions → random val images with detected bounding boxes
Trained weights
After training, the best model is saved in:
/content/runs/detect/train/weights/best.ptSo now you have a trained YOLOv8 model specialized for detecting cars and trucks!
Validation
Load the best trained model
model = YOLO('/content/runs/detect/train/weights/best.pt')✅ Key Insights:
- Loads the best checkpoint from training.
Run validation
model.val()✅ Key Insights:
- Uses the validation set defined in
data.yaml. - Evaluates:
- Precision (P) → How many detected vehicles were correct?
- Recall (R) → How many actual vehicles were detected?
- mAP50 → Mean Average Precision at IoU 0.5
- mAP50-95 → Stricter IoU thresholds (0.5 → 0.95)
Validation results

✅ Key Insights:
- For 35 images with 1147 instances (cars & trucks), we got:
| Metric | Value |
|---|---|
| Precision (P) | 0.903 |
| Recall (R) | 0.819 |
| mAP50 | 0.889 |
| mAP50-95 | 0.555 |
Class-wise:
- Car: mAP50 = 0.89
- Truck: mAP50 = 0.888
✅ High precision (~0.9) → few false positives
✅ Good recall (~0.8) → most vehicles detected
⚠️ mAP50-95 is lower (~0.55) → some difficulty with stricter IoU thresholds
Prediction
Image Prediction
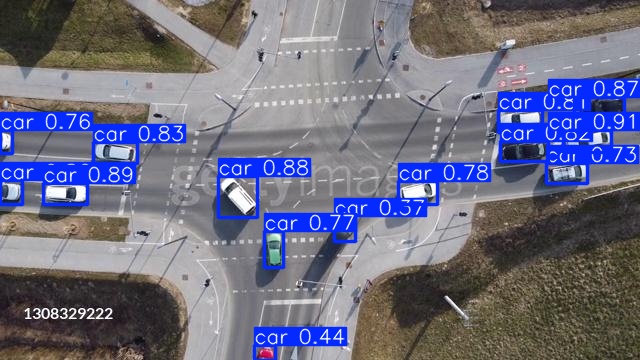
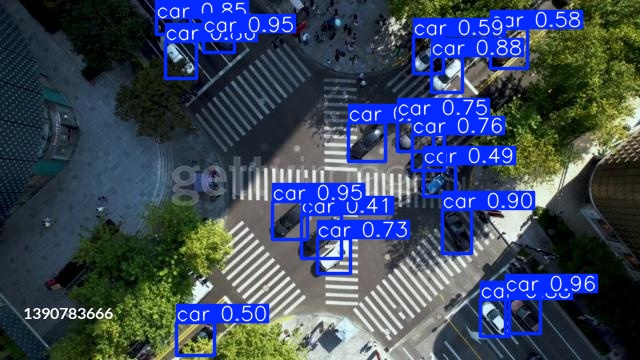
model.predict(source='/content/DroneCrossroadTracking-1/test/images', save=True)✅ Key Insights:
- source → folder with test images.
- save=True → saves images with drawn bounding boxes & labels.
- Saves outputs to:
- /content/runs/detect/predict/
Display the first 5 predicted images (quick visual check!)
import glob
from IPython.display import Image, display

image_paths = glob.glob('/content/runs/detect/predict/*.jpg')

for image_path in image_paths[:5]:  # show only first 5
    display(Image(filename=image_path))


Video Prediction
model.predict(source='/content/sample_video2.mp4', save=True)✅ Key Insights:
- source → a video file.
- YOLOv8 processes each frame, detects vehicles, and saves annotated frames.
After predictions, frames are saved as an AVI video. To convert it into MP4:
from moviepy.editor import VideoFileClip

clip = VideoFileClip("/content/runs/detect/predict/sample_video2.avi")
clip.write_videofile("/content/runs/detect/predict/sample_video2.mp4", codec="libx264")
✅ Key Insights:
- Converts AVI → MP4
- Makes it easier to view/download
Embed video in Colab
from IPython.display import HTML
from base64 import b64encode

mp4 = open('/content/runs/detect/predict/sample_video2.mp4','rb').read()
data_url = "data:video/mp4;base64," + b64encode(mp4).decode()

HTML(f"""
<video width=400 controls>
      <source src="{data_url}" type="video/mp4">
</video>
""")
✅ Key Insights:
- A trained YOLOv8 model detecting cars & trucks successfully.
- Predictions on both images and videos confirmed stable performance even in drone footage with varying object sizes.
Possible Future Improvements
- Expand dataset with more vehicle types and varied conditions.
- Train larger YOLOv8 models (s, m, l) for higher accuracy.
- Enhance data augmentation for better robustness.
- Add real-time tracking with DeepSORT
- Integrate traffic analytics like counting and congestion detection.
Code
👉 Download